
This is my fabric portfolio, like the one I made for the small destash swap a few weeks ago. I made mine to fit A6 size (A5 folded in half) cards.
This is a great way to destash using up your scraps of fabrics and is quick and easy. This would make a great mother's day gift, just fill with some handmade cards and you're set.
You need a main fabric, lining fabric and some heavier iron on interfacing.
So here is what you need to cut.
So here is what you need to cut.

You'll also need a pretty button and 30cm of thin ribbon.
1. Fuse interfacing to main fabric. If you are going to decorate or applique the front, do so now.
2. Iron the pocket piece in half and pin to bottom of lining fabric. Baste/sew pocket to lining using approx 5mm seam allowance.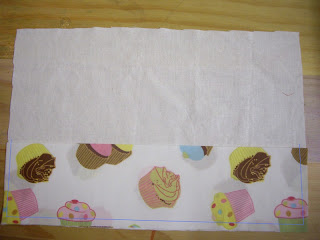.jpg)
3. Pin main fabric to lining fabric. Make sure the wrong side of the main fabric is facing you and mark/pin an opening as show about 3-4cm long and half way up that side.
.jpg) Sew around the edges using a 1 cm seam allowance. Don't forget that opening!
Sew around the edges using a 1 cm seam allowance. Don't forget that opening! 4. Mitre, cut off seam allowance at corners..jpg) Then turn the whole thing inside out.
Then turn the whole thing inside out.
Then turn the whole thing inside out.5. Make sure the pocket is on the lining side. Press all seams flat and make sure the opening is flat and both side meet up..jpg)
6. Fold your ribbon in half and place in the centre of the opening. Close up the opening and pin or tack the ribbon in place.jpg)
.jpg) Now top stitch around all the edges of the portfolio making sure to sew the opening closed and the ribbon is securely stitched in place.
Now top stitch around all the edges of the portfolio making sure to sew the opening closed and the ribbon is securely stitched in place.
7. Press the portfolio in half and sew upward (from the bottom of the pocket) to the top, following the crease line. See arrow..jpg) 8. Sew the button onto the front and press again.
8. Sew the button onto the front and press again..jpg) 9. Fill with your lovely handmade, or store bought cards and your done!
9. Fill with your lovely handmade, or store bought cards and your done!.jpg)
I hope you find this useful and if you make your own, be sure to let me know I'd love to see.
Bless,
Mel
Your blog is very nice! I have a top stocks blog! Welcome to visit!
ReplyDeleteThis project looks familiar for some reason? ;)
ReplyDeleteWell do on your first tute!
Mel, this is so cool. I never saw this tute before, I love it. Thanks for sharing the instructions. :)
ReplyDelete